
Hi, a hole different topic today. On the table is federation. In this case we want a third party solution to handle authenticate to Office365. Then we can control all the login function in our own product. Federation talks a specific language that is called SAML ( Security Assertion Markup Language ).
More information regarding SAML here: https://en.wikipedia.org/wiki/Security_Assertion_Markup_Language
In a federation we create a trust between two systems. In this case Office365 and Fortinet. A federation contains one IDP and one or more SP. IDP stands for Identity Provider and SP stands for Service Provider. Between an IDP and SP we send a SAML ticket. This ticket hold information that the SP needs to authenticate a user. You can think of IDP like this.
IDP is the one that holds the identity of the federation.
SP is the system that we want to login in to.
The short version
1. Own a domain
2. Configure the domain
3. Configure the domain in Office365
4. Setup IDP function in Fortinet FAC
5. Setup SP configuration i Office365
6. Setup users and authentication stuff in Fortinet.
Some things to have in your back pocket:
https://fortinetweb.s3.amazonaws.com/docs.fortinet.com/v2/attachments/502fabff-dbf1-11ea-96b9-00505692583a/FortiAuthenticator-6.2.0-Cookbook.pdf
https://docs.microsoft.com/sv-se/azure/active-directory/hybrid/how-to-connect-fed-saml-idp
The goal for this POC. The picture is from Fortinets Cookbook.
https://fortinetweb.s3.amazonaws.com/docs.fortinet.com/v2/attachments/502fabff-dbf1-11ea-96b9-00505692583a/FortiAuthenticator-6.2.0-Cookbook.pdf

Office365
This is very important. If you want to use Office365 as an SP in a federation it can only have one per domain. And it counts from top level. So if you own the domain roger.nu and want to try federation in a test. It is NOT possible to setup up a subdomain like test.roger.nu and try federation for that. At least when I did this. So you have to own a different domain to setup a test like this. rogertest.nu for example.
We will not go thru Office365 configuration to set up a new test domain in this post. This assumes that you have a domain in 365 up and running. If you want help with that please contact my friend at INVID @Schillman
But what I needed for this.
1. Own a domain
2. Configure the domain
3. Add user to the domain in office365
Domain config to work with office365

We have some stuff up and running already. Local AD and sync to Office365.

We start with the IDP configuration (Fortinet).
What we need here
1. Server Address must accessible with dns on BBI (Big Bad Internet)
2. We need to choose what login format.
3. We need a certificate for the federation. Create your own or use the built in.

Next step is to configure the SP (Service Provider) in fortinet in our case that is Office365. Press the +Create New for this.

Then we need to configure the SP (Microsoft) in fortinet.
SP name: Office365 (Just for fun)
SP enity: Will get poplated next
SP ACS (login) URL: https:/outlook.office365.com/owa/?realm=yourdomain.se
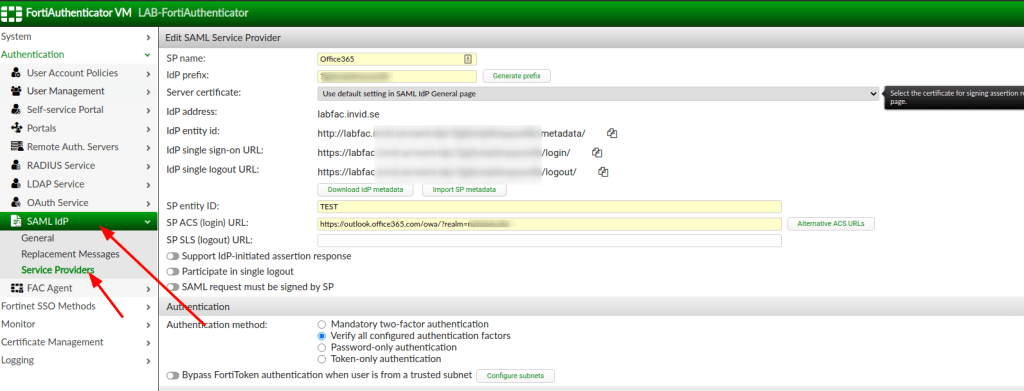
We download Microsoft Meta data and import it. This will auto fill things for us.
1. Download meta data from https://nexus.microsoftonline-p.com/federationmetadata/saml20/federationmetadata.xml
2. Press import SP Metadata
3. Choose the file you downloaded


After the import we get all the stuff that we need
SP ACS (login) URL: https://login.microsoftonline.com/login.srf

We also need to add SAML attribute called IDPEmail

Now it is time to configure Office365
We need to run Powershell for this, and we need to do it from a Windows box, because I can not get msonline work with pwsh or pwsh-preview on linux.
Start powershell and connect to Office365
Connect-MsolService
To disable federation:
Set-MsolDomainAuthentication -DomainName DOMAIN.com -Authentication Managed
To enable federation on the domain
New-MsolDomain -Name DOMAIN.com -Authentication Federated
or this will work also, ithink:
Set-MsolDomainAuthentication -DomainName DOMAIN.com -Authentication Federated
The command we will run look like this:
Set-MsolDomainAuthentication -DomainName $dom -FederationBrandName $BrandName -Authentication Federated -PassiveLogOnUri $LogOnUrl -ActiveLogOnUri $LogOnUrl -SigningCertificate $MySigningCert -IssuerUri $MyURI -LogOffUri $LogOffUrl -MetadataExchangeUri $MyMetadataExchangeUri -PreferredAuthenticationProtocol $Protocol
But before we can run this command we need to set the variables. As you can see these values are from Fortinet IDP settings.
$dom = "netware.site"
$BrandName = "FortiAuthenticator.netware.com SAML 2.0 IDP"
$LogOnUrl = "https://lab.domain.se/saml-idp/XXX/login/"
$LogOffUrl = "https://lab.domain.se/saml-idp/XXX/logout/"
$MyURI = "http://lab.domain.se/saml-idp/XXX/metadata/"
$MyMetadataExchangeUri = "http://lab.domain.se/saml-idp/XXX/metadata/"
$MySigningCert = "CERT....."
When you change stuff in Office365 and try different stuff, I needed to disable federation and eable it again! So keep that inmind if you are trying stuff.
Now we are able to authenticate to Office365 as Fortinet as authenticator.

When we press next we are sent to Fortinet page
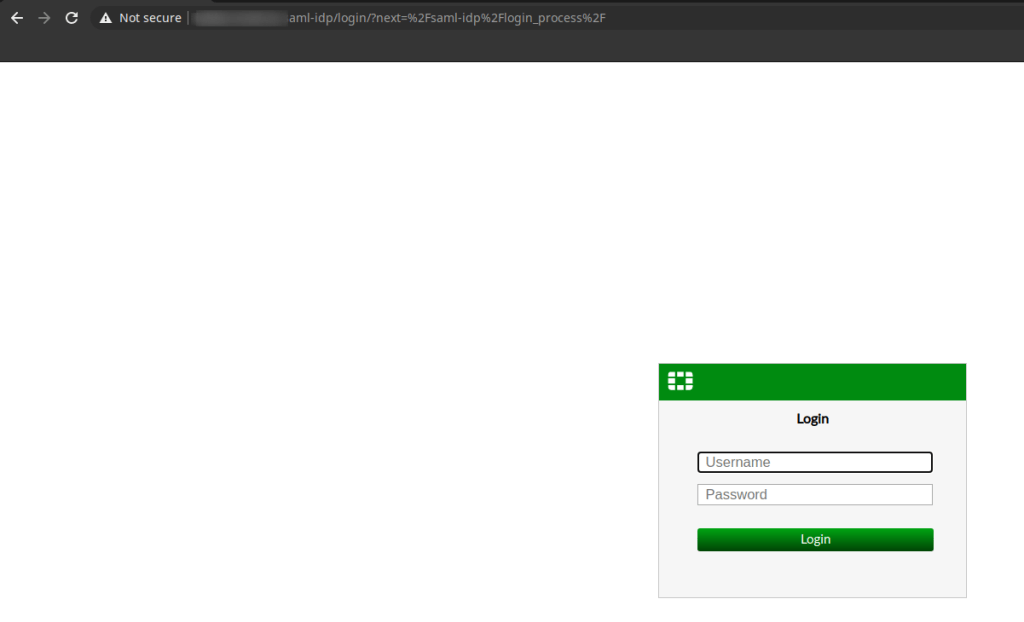
After we press Login we are sent back to Office365

I hope this help someone out there to configure Office365 as an Service Provider!
Have a nice day!
